Time to Cook!

Inspiration for wholesome weeknight & weekend cooking.

Archive for ‘June, 2013’

For some reason, I craved this when I was pregnant with both of my boys and might have had it everyday as an afternoon snack.  It’s healthy and somewhat filling and super easy!  I call it a milkshake because it really does taste like one, but it’s just milk and banana!  I’ve newly discovered unsweetened almond milk, which is fun to use in smoothies or in oatmeal.  It has a slightly nutty taste and is very good for you (twice the calcium and half the calories of cow’s milk).

Banana Milkshake

Banana Milkshake

Ingredients:

1 cup unsweetened almond milk (can use regular cow’s milk)

1 banana, cut into thirds

Directions:

Purée milk and banana in blender until smooth and drink immediately.

1 Comment

This is my easy recipe for Swiss chard – I love the flavor of this healthy superfood (excellent source of vitamins A & C and fiber), so I don’t do much to mask the taste.  If your kids won’t eat this, try pureeing it with a bit of the cooking liquid or chicken stock.  You can easily substitute kale if you wish (I prefer the taste of Swiss chard as I find it a tad less bitter).

Swiss Chard

Weeknight Swiss Chard

Ingredients:

2 bunches of Swiss chard (or kale), rinsed and chopped

1 tablespoon plus 1 teaspoon fresh lemon juice

3/4 teaspoon sea salt flakes

1/4 teaspoon freshly ground pepper

Directions:

Boil 12 cups of water in a large pot and add Swiss chard leaves and stems so they are submerged in the water.  Cook over medium heat for 10 minutes.  Drain in colander, pressing with back of a spoon to remove any excess water.  Return Swiss chard to the pot and add lemon juice, salt and pepper.  Serve warm.

Serves 6.

Leave a comment

This is one of my favorite, easy soups that I make regularly.  You could easily double the recipe and freeze extra into gallon ziplock freezer bags for future dinners.  This is a great vegetarian dinner (since you get protein from the lentils) served with a toasted baguette or rice.  My whole family loves this!

Lentil Kale Soup

Recipe inspired by one that I saw on San Francisco’s Golden Gate Mother’s Group.

Lentil and Kale Soup

Ingredients:

  • 1 Tablespoon olive oil
  • 1 cup carrots, finely sliced
  • 2 onions, diced
  • 2 garlic cloves, minced
  • 8 cups chicken broth
  • 2 cups dry lentils (I prefer red)
  • 4 bay leaves
  • pinch of kosher salt
  • 2 bunches of kale (or spinach), chopped roughly

Directions:

In a large pot, sauté the onions and carrot in the oil over medium heat for 3-5 minutes until onions turn clear.  Add the garlic and sauté.  Add the lentils and brown for 5 minutes (be careful not to burn the onions and garlic).  Add the chicken broth, bay leaves and salt.

Reduce heat to a simmer. Cover and cook until lentils are soft, about 45 minutes (less for red lentils). Remove bay leaves.  Throw in kale (or spinach), cover and simmer until greens are soft (about 10 more minutes).  Remove from heat, let cool slightly, and purée in blender before serving.

Great for the whole family.  Add more salt for adults when serving.

Leave a comment

This is a fun recipe because it’s easy to make, yet looks so elegant!  My kids like this (they think the stack is fun) or it could also make a nice side dish to a fancier dinner if you are entertaining.  It’s so delicious…

Personal Potato Gratin Stacks

Recipe from blog Witty in the City, which was adapted from Martha Stewart’s Everyday Food.

Personal Potato Gratin Stacks

Ingredients:

  • Baking potato – 1 (for 2 servings)
  • Gruyère cheese
  • Cream
  • Salt and pepper

Directions:

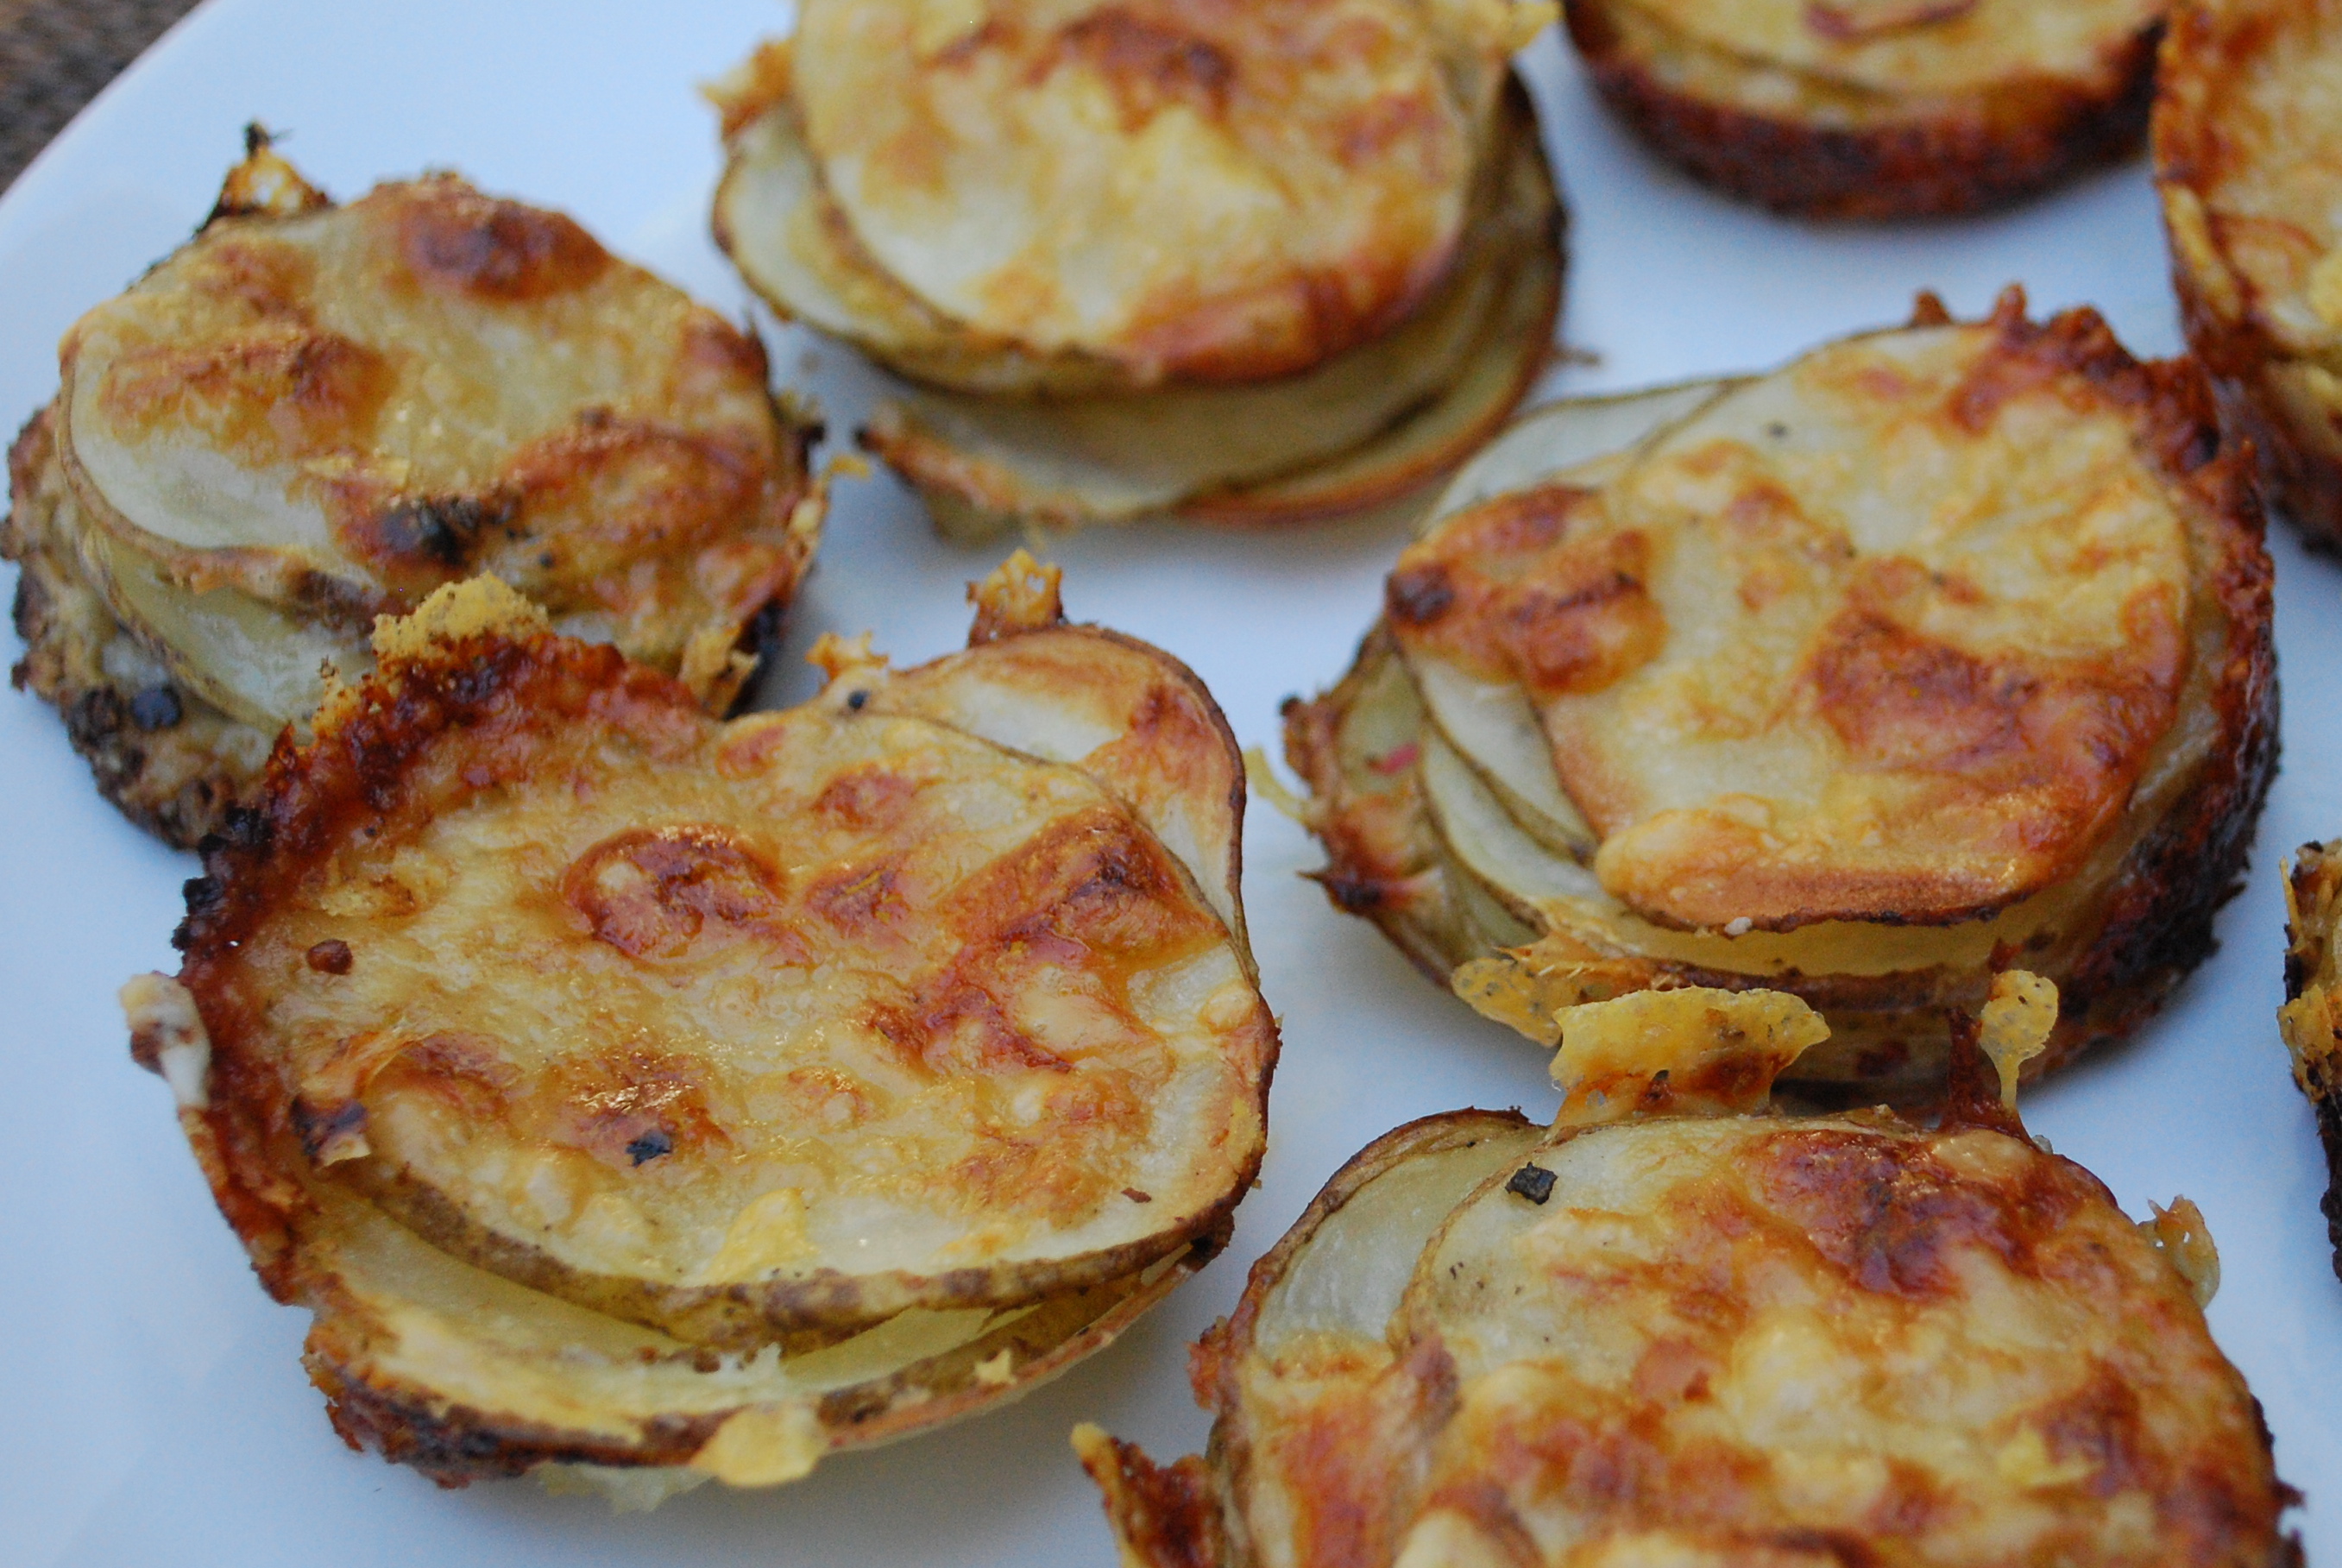
To make these potato gratins, preheat your oven to 400ºF. Use a mandoline to slice a baking potato into 1/8th of an inch slices. Make sure the slices are all the same size so that the potatoes cook evenly. One potato makes about 6 gratin stacks. Two stacks per person is probably sufficient for most people, but we each ate 3 and wanted more!

Coat a muffin tin with non-stick spray. Put 2 potato slices into each of the cups, and season them with salt and pepper. Sprinkle on some shredded Gruyère cheese. Repeat this process until your muffin tins are full, about 2 more times/4 more slices.

After you’ve salted and peppered the top potatoes, pour 1 tablespoon of cream into each cup. Sprinkle more shredded cheese over the tops.

Bake the potato gratins for 30 minutes or until the cheese is brown and the potatoes can easily be pierced with a fork. Run a small knife around the edges of the stacks to break them free from the muffin tin, and pop them out. I don’t know what happens to the cream, but these potato stacks aren’t liquidy at all.

The top layer is crisp from the cheese and the heat, and the bottom layer is crisp from touching the hot metal muffin tin. And the in-between layers are perfectly soft and cheesy. You can pick these stacks up with your fingers and take bites out of them (me), cut them with a fork and knife like a civilized person (David), or peel each layer apart for more individualized attention (also me). I want another one right now.

1 Comment

This is hands-down my favorite chocolate cake recipe.  It’s rich and moist and delicious.  Apparently, the cake is better when made the day before (so I’ve always done that).  The chocolate frosting is delicious too (although not pictured below).  This recipe makes two 8 inch round cakes, which you can stack with a layer of frosting in between – or one single layer rectangular cake.  Enjoy!

Mom's Chocolate Cake

Recipe from Food & Wine (contributed by Marcia Kiesel.)

Mom’s Chocolate Cake

This is a real old-fashioned American chocolate layer cake. It’s very moist, very chocolatey, a snap to make and best baked the day before serving. Marcia Kiesel acquired the recipe from her friend Joyce Cole, who got it from her mother.

Ingredients:

  • 2 cups all-purpose flour
  • 2 teaspoons baking powder
  • 2 teaspoons baking soda
  • 1 teaspoon salt
  • 2 cups sugar
  • 4 ounces unsweetened chocolate
  • 6 tablespoons unsalted butter
  • 1 teaspoon pure vanilla extract
  • 2 eggs, lightly beaten
Directions:
  1. Preheat the oven to 350°. Butter and flour two 8-by-1 1/2-inch round cake pans. Line the bottoms with wax paper. In a medium bowl, sift together the flour, baking powder, baking soda and salt; set aside.
  2. In a medium saucepan, combine the sugar with 2 cups of water. Bring to a boil over high heat and stir until the sugar dissolves; then pour into a large bowl. Add the chocolate and butter and let sit, stirring occasionally, until melted and slightly cooled. Stir in the vanilla.
  3. Beat the eggs into the chocolate mixture at medium speed until combined. Add the dry ingredients all at once and beat at medium speed until smooth. Divide the batter evenly between the prepared pans and bake for about 25 minutes, or until the top springs back when pressed lightly and a cake tester comes out clean. Cool the cakes in their pans for about 25 minutes, then invert onto a rack to cool completely.
  4. Set one cake, right-side up, on a serving platter. Using a metal spatula, spread one-third of the Chocolate Frosting evenly over the cake. Top with the second cake and frost the top and sides with the remaining frosting.

Chocolate Frosting recipe also from Food & Wine (contributed by Marcia Kiesel.)
Servings: Makes about 3 1/2 cups.

The inspiration for this frosting technique comes from dessert maven Maida Heatter’s Book of Great Chocolate Desserts (Alfred A. Knopf).

Ingredients:

1 1/3 cups heavy cream

1 1/2 cups sugar

6 ounces unsweetened chocolate

1 stick (4 ounces) plus 2 tablespoons unsalted butter

1 1/2 teaspoons vanilla extract

Pinch of salt

Directions:

  1. In a medium saucepan, bring the cream and sugar to a boil over moderately high heat. Reduce the heat to low and simmer, stirring occasionally, until the liquid reduces slightly, about 6 minutes. Pour the mixture into a medium bowl and add the chocolate, butter, vanilla and salt. Let stand, stirring occasionally, until the chocolate and butter are melted.
  2. Set the bowl in a larger bowl of ice water. Using a hand-held electric mixer, beat the frosting on medium speed, scraping the sides occasionally with a rubber spatula, until thick and glossy, about 5 minutes. Use at once.
Leave a comment

My friend Nicole served this at a baby shower and it was so decadent and delicious.  This is a great dish for a special occasion and it serves a lot of people (I think more than 8 people since it’s rich).  You can make it the day/night before and all you have to do in the morning is pop it in the oven.

Goat Cheese Strata

Recipe from Bon Appetit.

Goat Cheese, Artichoke, and Smoked Ham Strata

Makes 8 servings.

ingredients

  • 2 cups whole milk
  • 1/4 cup olive oil
  • 8 cups 1-inch cubes sourdough bread, crusts trimmed
  • 1 1/2 cups whipping cream
  • 5 large eggs
  • 1 tablespoon chopped garlic
  • 1 1/2 teaspoons salt
  • 3/4 teaspoon black pepper
  • 1/2 teaspoon ground nutmeg
  • 12 ounces soft fresh goat cheese (such as Montrachet), crumbled (about 3 cups)
  • 2 tablespoons chopped fresh sage
  • 1 tablespoon chopped fresh thyme
  • 1 1/2 teaspoons herbes de Provence
  • 12 ounces smoked ham, chopped
  • 3 6 1/2-ounce jars marinated artichoke hearts, drained, halved lengthwise (about 2 1/2 cups)
  • 1 cup (packed) grated Fontina cheese
  • 1 1/2 cups (packed) grated Parmesan

preparation

Preheat oven to 350°F. Butter 13 x 9 x 2-inch glass baking dish. Whisk milk and oil in large bowl. Stir in bread. Let stand until liquid is absorbed, about 10 minutes.

Whisk cream and next 5 ingredients in another large bowl to blend. Add goat cheese. Mix herbs in small bowl to blend.

Place half of bread mixture in prepared dish. Top with half of ham, artichoke hearts, herbs, and cheeses. Pour half of cream mixture over. Repeat layering with remaining bread, ham, artichoke hearts, herbs, cheeses, and cream mixture. (Can be made 1 day ahead. Cover; chill.)

Bake uncovered until firm in center and brown around edges, about 1 hour.

Leave a comment